
As everyone knows by now I don’t do repairs anymore! Well, I try very hard not to.
So, what’s a slope nut to do? – Fix it yourself of course!
I’ve seen some really awful repair techniques and I thought it would be useful to share what I do (did!). I’ll put it up here and build up a series of articles over time. All my ‘secrets’ will be here but really it’s not difficult you just have to give it a go!
New
technique repairing broken wing skins, Sicomin PB250 expanding epoxy. Part 3 Structural
If your
fortunate and you’ve only burst open your leading edge or its minor small stuff
like a broken tip etc then this is a great way to repair them.
 |
Big Ceres leading edge hits rock and burst open, its delaminated around the impact and skins crushed, so much that I had to dremel away a slit so they lined up again. This is the bottom skin. I used to
cut out delaminated skins and replace them bridging the new skin in from the
inside and outside. Very time consuming especially as you need a mould to make
the new replacement skin. If you just repair from the outside problem comes
when you try to sand and feather in the edges to blend the new skin to the old,
chances are you press the skin down and instead of an accurate blend you end up
with troughs that shouldn’t be there and then its more filling or laminating or usually both!
|
 |
| This is top skin damage, bits of leading edge missing, pretty minor really but squishy and needs strength again. |
The problem
is the surface you’re trying to sand is not very rigid. Even undamaged skin
flexes so as you press down with a sanding block you can quite easily create inaccuracies.
For small
areas of repairs then I have now started using new magic stuff called expanding
epoxy. It’s very rigid and because its epoxy it bonds incredibly well. For
repairs it’s a god send! Take a look at the Big Ceres wing with a chunk knocked
out of the leading edge. It had a temporary repair with expanding PU glue (Beli-Zell)
but PU (like a denser builders foam) is not exactly rigid and the bond is
easily broken. So it was picked out and redone with Sicomin PB250.
 |
| Pull out the bits that really can't salvage and you're left with a gaping void. |
This stuff
is amazing! The Aussies pioneered the way with similar expanding epoxy called Ampreg
F230. They used it to make quick and easy solid moulded wings- a 60’’
DS wing weighing in at 1.4kg! Which for DS is fine but anything else is a tad
heavy. I dug around a bit, spoke to a few people and discovered Klemm models in
Germany
 |
| Yes, 3g! |
Sicomin PB
250 is a 2 part epoxy like we are used to but the resin contains the foaming
agent activated once the hardener is mixed in. This expands by 4 x its volume,
more if you heat to about 30c before you mix it with hardener. A 25mm cube
weighs just 3g this way and I reckoned I needed about 4 x this amount to fill
the damaged area. In the end I just needed to pump in about 8g of mixed epoxy
giving nearly 3 times my test cube of expanded epoxy. I just used a syringe and
mixing stick to apply around the damaged area. I did however put some sponge
behind it so that it expanded more or less where I wanted it to. The sponge
weighed about 1g. I put some masking tape over the holes to keep the epoxy
inside the Dbox and set the wing leading edge down in the heat box. 6 hrs later
at 30c and I took the tape off to have a look and it’s just about gone off. Of
course I can’t see where its expanded, whether I’ve put too much in or whether
its nice and uniform but it doesn’t matter- the skins are rock hard! And that’s
where before they were squishy and clearly delaminated. Had I missed a bit I
would have just drilled a hole and pumped a bit more in with a syringe but I
didn’t have to.
 |
| Sponge inserted and positioned inside the DBox just to try to keep the epoxy where I want it. Sponge weighs just 1g. |
It really
is so much more rigid than the original surface and in this application it
weighs just 8g!!! I guess the total repair is going to be around double that
painted and for a 975g wing panel (it’s 3.5m!) that’s really nothing.
The
significance of having a solid surface to work on is huge. It’s much easier to
blend a fuse repair than a wing repair because it’s more solid. This leading
edge repair is the same now. Laminating the outside and surface finish we’ll do
next time but the use of expanding epoxy is a great technique for all but the
largest of areas. It would be too heavy to fill your entire D Box for example,
at normal room temperature it weighs 250kg per cubic metre cured. For small areas
it’s just perfect as it means you don’t need to laminate on the inside even if
you have cut through the skin as I have to line them up again.
 |
| In it goes into heat box with leading edge down and tape over the top to get the epoxy inside the DBox. |
I’ve been
playing with expanding epoxy a lot and it has great possibilities, not just for
repairs or even construction. Used in large volumes it has some problems which
need experimenting further. One is shrinkage if you don’t post cure and most
expanding epoxies need a post cure. This is heating of the piece at anything
from 40-80c for a period of up to 24hrs. This is after the initial cure usually
for 24hrs at room temperature. Most epoxies should have this kind of curing but
many manufactures don’t. This is why some models can be badly damaged by
sitting in the hot sun. It’s just epoxy chemistry I’m told and post curing
ensures cross linkages which make it more stable. It doesn’t matter how
long you leave epoxy to cure at room temperature, it’s never as strong as one
that is post cured. Also it can exotherm during the initial cure so heating up
at this stage is not a good idea. Of course the biggest problem is if you use
too much in an enclosed mould. Although the pressure of the expansion is low
unlike builders foam, if can expand too much so you need to calculate the
volume if filling a mould entirely and can force open your mould and warp it.
 |
| Tape removed after 6hrs at 30c. Its filled the holes and the skin is rock solid! Repairs on the outside next but a lot easier when the surface is hard! |
None of this
really applies to using small quantities as shown. If it’s cured with heat its
better of course and if it’s not in an enclosed space it is free to expand as
much as it likes without distorting your skins, the sponge used isn’t going to
offer huge resistance to that. I don’t see any sinkage cured at 30c for 6 hrs
either. You really don’t want to heat anymore than that with most moulded
models or you could get distortion of the skins if indeed it hasn’t been post
cured.

If you want
some Sicomin PB250 let me know and I’ll get a batch of small tins, say ½ kg that
should be enough for the most accident prone!
Fuse Boom Repair
Part 1, Structural.
OK, we’ll kick of with probably the most common repair and hopefully tackle a few tricky bits a long the way:
This is a typical boom repair. It’s a Mini Vector broke just behind the TE. It was creased, 2/3 round the boom and not so bad it was hanging off. It has snakes running inside which fortunately were not damaged. Pretty much the sort of stuff that every Slope flyer has done and easily made flyable again with a wrap on the outside (Argh!!!!). Another ‘bodge’ is to grind away the break no a whisker of going through and lay a wrap and hope for the best!
I don’t.
The best way by far I have found is to grind through. Miss the snakes, leave these intact and the uncreased/undamaged part so the fuse is still in one piece. The opening is then just an entry to slip in a preformed section of carbon or better still carbon Kevlar. These are actually bits of cut off from previous jobs I saved. I used 2 pieces on either side of the snake inner. The gap for entry is only about 5mm or so wide, just enough to slip in at an angle and then pull tight with a small hook (after drilling holes in the insert). Here’s the controversial bit- I attach to the inside with thin/med cyano!!! Just pull tight against the inside of the fuse and tack near the hook. Let that just begin to bond and if needed, have holes drilled in the insert so that you can pull the piece long the opening so that you get a tight bond between the insert and the inside walls of the fuse. Once tacked, drizzle in more cyano along the edges.

Of course if not using a jig to do this eye up the seam to make sure your still true. Any adjustments now is easy with a heat gun and then bit more cyano to lock everything in place.
I usually leave this an hour or two before going onto the next stage to give it a chance to go off completely.
Not that it’s a good structural repair at this stage as a cyano joint is just going to crack at the merest hint of any shock load but this is really not the purpose!
It will become clear- The next stage is to chamfer the edges between the fuse and the insert. I just roughly do with a dremel and sanding drum then 60g production paper to smooth off. As you can see, I don’t chamfer loads, probably about 10mm tops but the edges and the exposed bit of insert are all gone over to get a good surface for bonding on the next stage.
This is after roughing up with the dremel, The purple weave is the insert.

Here, I use carbon on a bias and I’ve found on small jobs like this many layers of lightweight stuff is easier to do than a few layers of heavy. Not critical but I used 93g cloth for this. It’s just that it’s very easy to make mess of the weave with say 200g. As I don’t pre wet my cloth. I simply brush on a good coat of laminating resin over the sanded area and lay on strips dry. This keeps in place and just prod and push with the brush to get in the right position. Put a good few layer over I think in the deepest parts I used about 12 layers. The ‘skill’ if you like is to keep the carbon as close to the repair area as possible. Anything on the good areas will only need to be sanded off. It has to stand proud when you have judged enough layers. By now you will have a frightening mess of expensive carbon with way too much epoxy and just laid on top of the repair which at any moment will fall off!

You need the right resin to cloth for a strong bond and so get the tissues out and blot well without pulling everything off. Don’t go mad, just get the worst off. Clean off the epoxy off the boom areas too, keep it neat as any unwanted epoxy is just going to mean more sanding later. I use acetone for this but thinners works too.
Next is a layer of peel ply. Peel ply for the uninitiated is a nylon cloth that epoxy doesn’t stick too well to but allows resin to pass through. I wrap a layer over the repair and then in this case use a layer of soft sponge over the peel ply. Some off cut pipe lagging over that and then a hard wrap with PVC/insulation tape to squish everything together and add pressure. The lagging just smooths out the tape so that you don’t get ridges and the soft sponge, well acts like a soft sponge, soaking up the excess epoxy!

Keep an eye on the seam lines and use a bit of pvc tape stretched along the boom to pull things true again if needed. Then I bung in a heat box for a few hours, hang, drape over a radiator or anything with preferably a bit of heat will improve the cure.
Here it is fresh out the heat box. (3 hrs). Its still not fully cured but enough to tear off the wrap.

Yours might not come out the first time as neat and sure you’ll probably have a recess because you didn’t put enough layers on and that’s no problem just add a bit more and repeat again. Just better that its solid carbon instead of lots of filler.
You can see that there isn’t tons of flatting to do to get the shape and yes will need some filler but mainly to fill the weave.
So, what this technique has enabled is the inserts allows you to replace the damaged area with carbon as least as thick as the original lay up. Using good practises with good resin to cloth ratio you will have a stronger new lay up especially with carbon on a bias. The insert is bonded extremely well now mainly to the exposed bits and so the ‘cracked area’ actually has a thicker lay up. This is why I don’t bother to epoxy the insert, cyano is fine as it’s not the final joint. Also I don’t chamfer the break excessively using this technique I've found there isn't any need. If it breaks again its not at the repair, its usually further down. From my prospective, that’s a good thing!
Finally, keep neat as you will save a lot of work later. Carbon is beautiful to sand. Kevlar is not!! Glass it if you want but if you are going to this much trouble better to use stronger stuff and have a bit of overkill. It may make up for poor lay up techniques as many a time I’ve used carbon and ended up with a tangled mess brushing in too little resin and ending up with the weave at anything but at 45 degrees!
Cheers T
Part 2: Finishing and painting
 Well, that's the easy part over! Next bit just takes time and a bit of patience, really.
As you can see I start off with production paper (60g is fast). Use blocks, freehand some bits, whatever you find comfortable to get the repair blended in.
60g leaves deep score marks so next stage is wet and dry. I use washing up liquid, it cuts better and clogs less. Work up the grits; I use 240, 400 and then 600. Then it's on with the filler to fill the weave and any toughs in the repair.


 More wet sanding. Repeat filling again if necessary!
Once you have the best surface you can, then prime. I wipe the whole area with thinners first to clean any contaminants. Last thing you want is any silicon reaction (tiny pit holes in the paint). After priming and cured. I wet flat again lightly with 800.


Here it is, after 3 coats and still wet. Holts Dupli Colour isn't a hard paint like 2 pack and yes it oxidises with time and goes dull. You can wait until this is cured and compound up (or Tcut), wax and leave as that but I've found a coat or 2 or clear lacquer keeps the shine and a bit more protection to the paint. I'll be doing that when this has cured.
OK, yes it's laborious to get this finish but that's how its done and if a jobs worth doing.........T

Part 2: Finishing and painting
 Well, that's the easy part over! Next bit just takes time and a bit of patience, really.
As you can see I start off with production paper (60g is fast). Use blocks, freehand some bits, whatever you find comfortable to get the repair blended in.
60g leaves deep score marks so next stage is wet and dry. I use washing up liquid, it cuts better and clogs less. Work up the grits; I use 240, 400 and then 600. Then it's on with the filler to fill the weave and any toughs in the repair.


Once you have the best surface you can, then prime. I wipe the whole area with thinners first to clean any contaminants. Last thing you want is any silicon reaction (tiny pit holes in the paint). After priming and cured. I wet flat again lightly with 800.


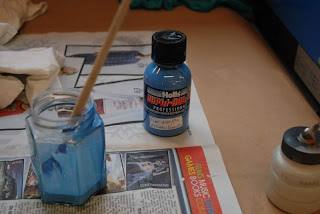
This is the top coat I'm using, single pack acrylic from Halfords. (Holts Dupli Colour). They mix up for you, but any car refinishing supplier can offer you a similar paint. The Mini Vec here was matched to a Fiat Blue. I'll be using an airbrush to apply. This is an Iwata Revolution- a low to mid price brush and excellent for most work smallish areas unless you are respraying a wing panel. It will do most jobs and I guess 90% of my painting is done with an airbrush. Of course The colour was a little off and I admit I did tint myself to get a closer match.

Here it is, after 3 coats and still wet. Holts Dupli Colour isn't a hard paint like 2 pack and yes it oxidises with time and goes dull. You can wait until this is cured and compound up (or Tcut), wax and leave as that but I've found a coat or 2 or clear lacquer keeps the shine and a bit more protection to the paint. I'll be doing that when this has cured.
OK, yes it's laborious to get this finish but that's how its done and if a jobs worth doing.........T

Thanks Tony
ReplyDeleteVery informative, looking forward to the next instalment!
Alex
Excellent feature Tony. Keep up the good work :o)
ReplyDeleteBlooming heck!
ReplyDeleteNot often that a mast craftsman shares his trade secrets.
Thanks very much.
Nige
Thanks for the info mr fix-it
ReplyDeleteTONY-T
I have total respect for those skills, you're the zen master of mouldie repairs Tony.
ReplyDeleteI can make it strong and straight but I never manage to get the final cosmetics half as good as this. So labour intensive! No way to make a good living doing this work, there aren't enough millionaire slope soarers to fully pay for your time at a proper commercial rate - plus it would only take a few hours work to add up to more than the cost of a new mouldie.
Thank you Tony. How would you modify the technique if the fuse was in two bits?
DeleteTony, I know that the day will come where I will read your article much more in debth, and with shaking hands use all the good advice that you have posted in these tips. Also, I know that I will never be able to make the quality job that you do. But, I will do my best. Thanks a lot for presenting us with these little/huge gifts.
ReplyDeleteJens Chr.